We, software developers, seem to know that system security is important. We use hundreds of different online tools, systems, and websites every week and we generally trust the ones made by respectable companies. But how can you make an app that would match all of the industry standards?
Storing passwords securely, using secure SSL connection, OAuth 2.0, are just some of the most basic requirements. Yet times are changing, new language features, new frameworks are being introduced and our knowledge might be out of date. After all, think about it for a second – how would you implement a fully functional, bugless and thread-safe OAuth 2.0 client, if you started a new Xcode project?
On the other part of the equation, in 2021, Swift Concurrency was introduced. The asynchronous functions were transformed using async/await, making our code more readable and less error prone. The introduction of Actors was also very welcome, although the usage and understanding of them is not as apparent.
This blogpost seeks to explain OAuth 2.0 specifics and the usage of Swift Actors, and, most importantly, combine them to create a modern OAuth client.
OAuth 2.0 Authorization Flow
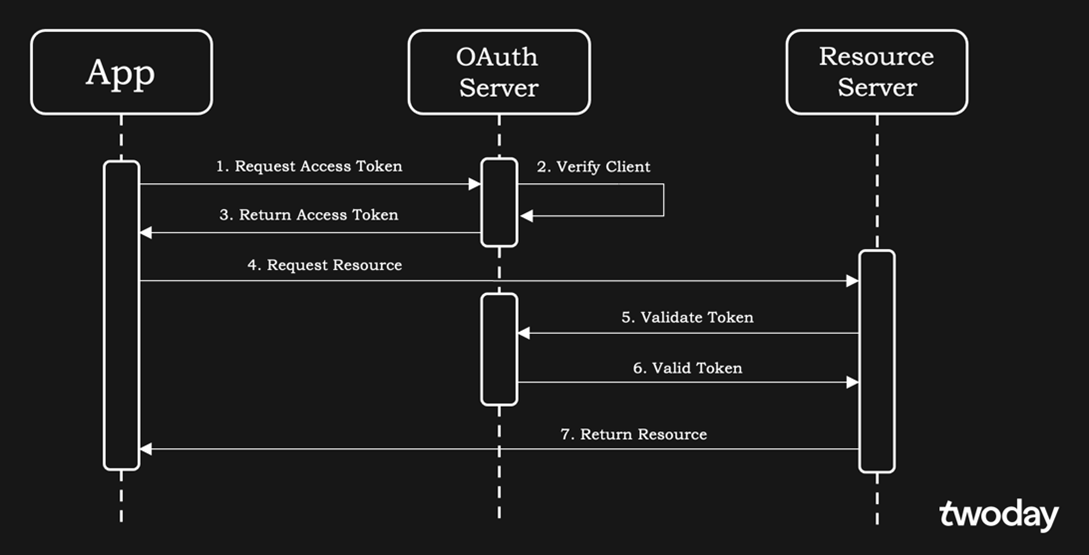
Suppose you want to fetch a resource (e.g., invoices that you have created) from the server into your app. You should be able to fetch only your invoices, not the ones that another user has created. If the server returned all invoices, created by anybody, not only would it be an inconvenience, but it would also be a security issue. Therefore, the server must authorize you. In, OAuth 2.0, the authorization flow to access a resource from the server is rather complex:

We will break this process down into steps:
Steps 1–3: An access token is requested from OAuth provider. The client (our app) can identify itself by sending username+password combination, some token of identification or by other means. The server will check if the specified credentials are valid, and, if so, will return an access token that will be used in the following steps.
Step 4: A GET/POST or another request is made to the server with the attached access token to access the resource.
Steps 5–6: The server validates whether the access token is valid and identifies the client.
Step 7: The server returns the resource.
For beginners, this process may seem unnecessarily complex. It would be much easier to just skip the OAuth provider-related steps and just send username+password combination to the server so that it could easily identify you (this is also known as Basic Authorization). However, there are multiple benefits in using OAuth. To state a few of them:
- When you acquire an access token, it’s valid for a predefined period, typically 1 hour. This means that for most of the requests, you can skip steps 1–3 and just reuse the same access token until it expires.
- If someone, e.g., through man-in-the-middle attack, acquires your access token, it will be unusable after 1 hour. It’s much less likely for someone to steal your username and password this way.
- The resource server does not have to know and store the sensitive username and password – it never receives it. Only the OAuth provider knows your credentials. That’s how Google, Facebook, etc. logins work.
- And more…
This blog post will not cover the further specifics of OAuth 2.0. There is a lot to it and the internet is filled with various tutorials and explanations. We will rather concentrate on how to make the authorization work elegantly in Swift.
Designing App’s Networking Client
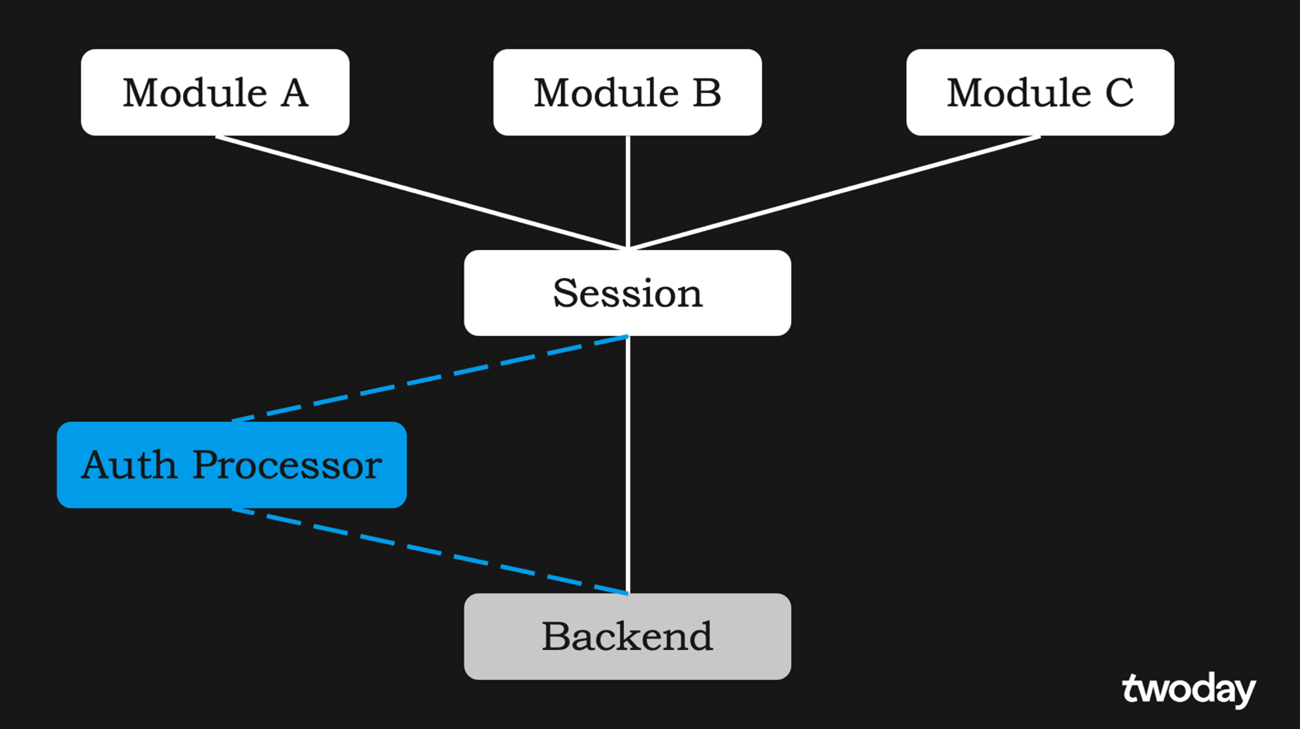
Suppose we have three separate modules (parts of your app) – Module A, Module B, and Module C. The simpliest way to make server requests would be to use one (shared) Session (the same applies whether you are using Foundation’s URLSession or Alamofire‘s Session) and use an Auth Processor to manage the authorization:

This would work in most simple scenarios, however, there are cases where this set up falls short:
- Defining different Session configurations for different Modules. For example, a single-Session setup would not allow the timeout for Module A to be 30 seconds and for Module B to be 60 seconds.
- Cancellation of Module’s requests. It would only be possible to cancel all unfinished requests, initiated from all the Modules. Cancellation of only Module A’s requests would not be easily achievable.
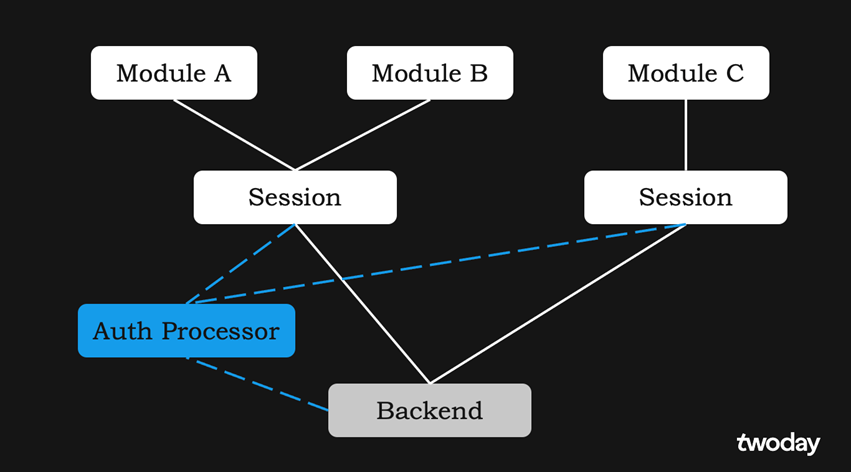
In other words, our Auth Processor should support multiple sessions. The app structure would then look like this:

Designing Auth Processor
These are the main requirements that our Auth Processor will have to meet:
- If a valid (non-expired) access token already exists, we must use it.
- If there is no valid access token when we want to perform a request to backend, we must acquire that access token first before using it.
- Our processor must be thread-safe because multiple modules may request different resources at the same time.
- If an access token is being refreshed at the moment, all new requests must wait until that token is refreshed and then use it. The refresh token can only be used one time.
- Due to the reasons mentioned above, only one Auth Processor can exist. This can be achieved by using a Singleton Pattern.
With this in mind, let’s build a OAuthProcessor that returns a OAuthToken (e.g., a struct, containing access token that can be added to our resource request):
protocol OAuthToken {
  var token: String? { get }
  var refreshToken: String? { get }
  var isValid: Bool { get }
}
actor OAuthProcessor {
  var token: OAuthToken? // 1

  func getToken() async throws -> OAuthToken {
    // 2
    if let token, token.isValid {
      return token
    }

    // 3
    let token = try await performTokenRequest()
    // 4
    self.token = token

    // 5
    return token
   }

  func performTokenRequest() async throws -> OAuthToken {
    /* ... */
  }
}
In the code above, we have created an actor named OAuthProcessor. Let’s break it down:
- If a token was already fetched previously, it is stored in a variable.
- When getToken() is called, we first check if a valid (non-expired) token already exists. If yes, there is no need to refresh the token, so it is immediately returned.
- If the token did not exist or it was expired, we make a network request to refresh the token (or to acquire a new one, if we’re logging in).
- Once the token is fetched, we save it to self.token variable so that it would be available for later getToken() calls.
- A final OAuthToken is returned.
Our choice to make OAuthProcessor an actor comes down to the before-mentioned requirement that the OAuthProcessor should be thread-safe. In our context, thread safety means that no two concurrently running threads should be able to run getToken() function. If one call is checking the validity of OAuthToken in 2nd step, the second call must wait until getToken() execution of the first call finishes.
Everything would be perfect if this worked... However, it won’t :)
Working around Actor Reentrancy
Swift, along with its implementation of async/await functions and actors, is very focused to making the code work fast and avoids blocking any threads whenever possible. Therefore, whenever it encounters await keyword, if the function that is being called is not bound to the same actor, it will move to a different thread, making the actor unoccupied. This is called Actor Reentrancy and is very well explained in this write-up.
In our case, it will make our thread-safe requirement fall apart. On try await performTokenRequest() (3rd step), the code execution will be suspended – our code will wait until the performTokenRequest() finishes before continuing, however, the actor will be free to execute any other calls (even to the same getToken() function).
In order to fix this issue (and make getToken() really wait for performTokenRequest() to finish), we will have to utilize Tasks. When we create a Task, we provide a closure that contains the work for the task to perform. A reference to that Task can be saved so that we could wait for the Task to finish, for example, like this:
let task = Task {
  try await downloadImages(images)
}
let images = try await task.value
To fix the side effect of actor reentrancy, we would incorporate Tasks like so:
actor OAuthProcessor {
  var token: OAuthToken?
  var tokenTask: Task<OAuthToken, Error>? // 1

  func getToken() async throws -> OAuthToken {
    // 2
    if let tokenTask {
      return try await tokenTask.value
    }

    if let token, token.isValid {
      return token
    }

    // 3
    let tokenTask = Task {
      try await performTokenRequest()
    }

    self.tokenTask = tokenTask

    // 4
    let token = try await tokenTask.value
    self.token = token
    self.tokenTask = nil

    return token
  }

  func performTokenRequest() async throws -> OAuthToken {
    /* ... */
  }
}
Once again, let’s analyze the code (I will only analyze what’s new to our OAuthProcessor):
- We have created a tokenTask, to store the Task of performing token request. On success, it will return OAuthToken, and on failure, it will return an Error.
- This is the essential part of the updated code. Before starting any token checks or requests, we first check if there is an ongoing OAuthToken retrieval Task. If so, we bail out of everything else and just wait for that Task to finish. This ensures that no multiple performTokenRequest()‘s will be made.
- If there was no Task at the 2nd step, we create it here.
- We wait for the Task to finish and save its returned object (OAuthToken). We also clear the self.tokenTask because we do not want the next call to hang up on 2nd step.
The OAuthProcessor will finally work as expected – the thread safety will be guaranteed. Also, if multiple requests will need the auth token while it is being refreshed, they will wait together for that token to refresh, and all the requests will then use the same token, which is brilliant. In fact, when functions encounter await and are suspended, they are resumed in the same order, meaning that 1st request will receive the token first, then followed by 2nd request, and so on.
Wrap-up and unmentioned details
In this blogpost, we have analyzed a possible design for OAuth handling which is modern, thread-safe and universal. If the proposed implementation of OAuthProcessor does not seem appealing, I hope I at least managed to shed some light on the usage and side-effects of async/await functions and actors. Nevertheless, here are some details that are missing from our final OAuthProcessor implementation:
- Storage handling. It would be a good idea to store the token on the device so that after app is closed and reopened, it could be reused. Because it is sensitive information, you should treat it like a password and use secure storage, e.g., Keychain.
- Building the request. The performTokenRequest() method we used to fetch the token hides the implementation of how that request built. However, because it is an async function, both URLSession or Alamofire could be used with ease.
- What to do with the token? The token returned by getToken() should be used somewhere (duh). It should be appended to the original request that was meant to access a resource (typically with Authorization: Bearer HTTP header). That request should not have been started and should have been waiting for a valid OAuthToken to be returned.
- Logging. Of course, to be sure that nothing has gone haywire, logging should be implemented to your system of choice. Or at least use print() statements while implementing the code.
Happy coding!
